¶ Trainer
Trainer manages the training loop: it updates project files, creates jobs, builds the dataset, runs training, converts the model to ONNX, and generates predictions for the next step.
¶ Recommended workflow
Do not wait until you have a large manually labeled dataset. Start with a small first job, get the first model, and then gradually increase the size of the next jobs.
- Label the first
5-10frames by hand. - Run
Start automatic training. - While
Traineris training the first model, add a bit more manual labeling if it does not slow you down. - When the first model is ready, use it to auto-label the next job.
- Once the model suggestions become useful, increase jobs to dozens and then hundreds of frames.
- Fix mistakes and keep repeating the cycle.
In this workflow, every cycle gives you a new model, and your manual work gradually shifts from full labeling to reviewing and correcting auto-labels.
¶ First run
For the first pass, keep the default settings:
| Setting | Default value | What it means |
|---|---|---|
Yolo8/10+ base model |
yolo11s.pt |
The base weights used to start training. |
Epochs |
50 |
How many epochs to train the model. |
Model Size |
640 |
imgsz, the YOLO input image size. |
Train/Validation % split |
80% |
How many images go into training, with the rest used for validation. |
Batch size |
5% |
How many unlabeled files to include in the next job. |
| Auto-label confidence | 25% |
Confidence threshold for auto-label suggestions. |
| Prediction IoU | 70% |
IoU threshold for merging similar predictions. |
In practice: create the first job, label it, click Finish Job, then click Start automatic training. While the first training run is in progress, you can manually prepare a few more frames. Once the first model appears, move on to larger jobs and review the auto-labeling.
¶ Main buttons
Start automatic training starts the training loop.
Stop automatic training stops the current loop.
Run once performs one training cycle and stops.
Run until stopped keeps running until you stop Trainer manually.
Create Task creates a new labeling task from the available frames.
Annotate Task opens the first unfinished task in the annotation editor.
Refresh recalculates the state of project files, labels, tasks, and predictions.
¶ Training modes
Local Training runs training on your own computer. This requires the ready prerequisites.
Google Colab prepares a ZIP archive with the dataset so you can upload it into a Colab notebook. This is useful if your local machine is weak or no GPU is available.
For the first run, use Local Training: YoloEase will train the model, convert it to ONNX, and run predictions automatically. In Google Colab mode, YoloEase only prepares the data and shows a notebook link; you need to bring the cloud-trained model back into the project manually.
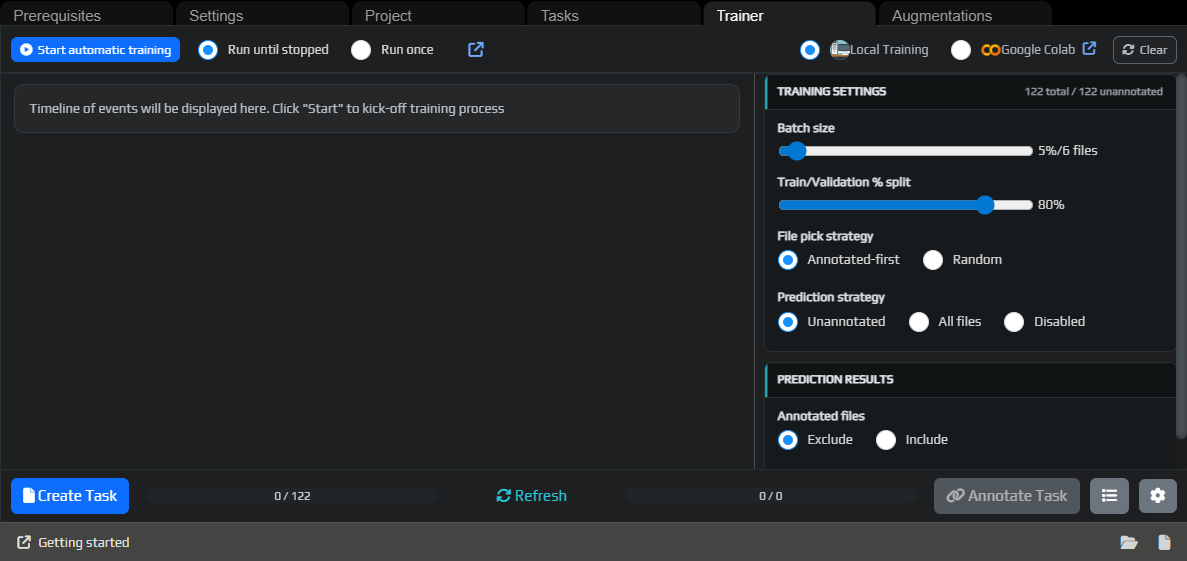
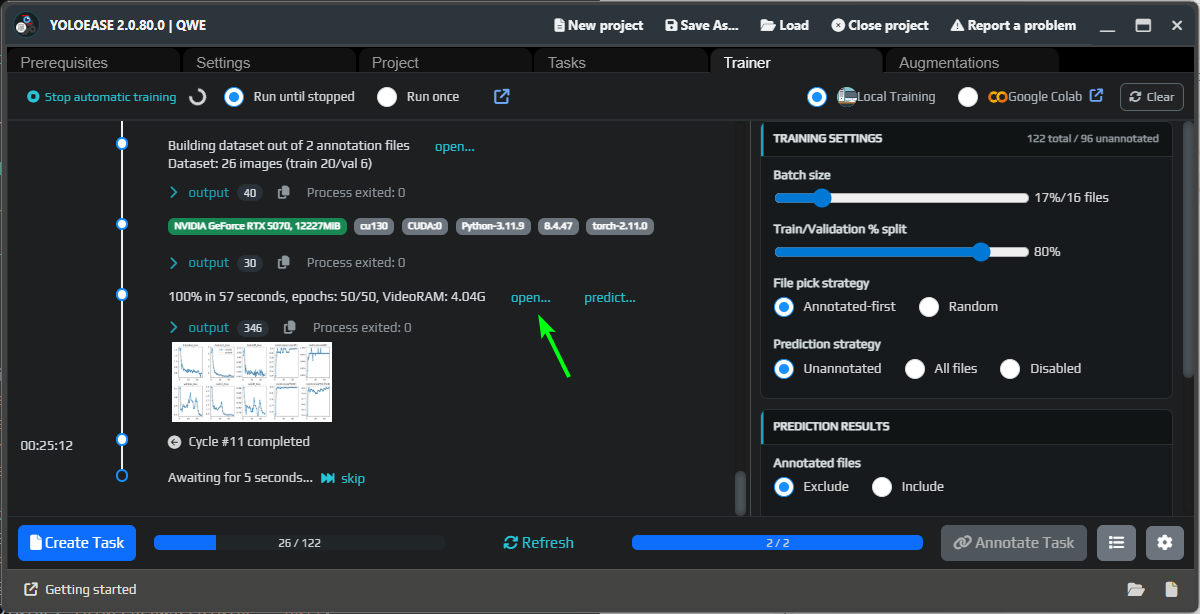
¶ Batch size
Batch size in the right panel controls the size of the labeling job. The value is stored as a percentage of the still-unlabeled files, and YoloEase shows the actual file count next to it.
For the first manual pass, keep it smaller. Once the model appears, increase the batch size: first to dozens of frames, then to hundreds if auto-labeling is already saving time.
¶ Train and validation split
Train/Validation % split divides the dataset into training and validation parts. Training images are used to train the model, and validation images are used to evaluate quality.
If the validation part is too small, the charts will be noisy. If the training part is too small, the model will learn worse. For the first pass, the default value is usually enough.
Right now, YoloEase creates train and valid without a separate test. YOLO needs at least one frame in train and one in valid, otherwise training cannot start. For rare labels such as btn, make sure they do not appear in only one or two frames.
¶ File selection strategy
Annotated-first first takes unlabeled files that already have model predictions, and then fills the rest with random frames. This works well for iterative improvement: the next job is more likely to contain frames the model has already tried to detect.
Random is more purely random. This is useful when the dataset is already large and you want to avoid getting too many similar frames.
¶ Prediction strategy
Unannotated runs predictions only for files that are still unlabeled.
All files runs prediction on every file in the project.
Disabled skips the prediction step and uses the results that already exist.
Prediction results are used for statistics and for the next round of auto-labeling.
All files can be expensive on a large project. For the normal workflow, keep Unannotated enabled and switch to All files when you want to re-evaluate the whole project with a new model.
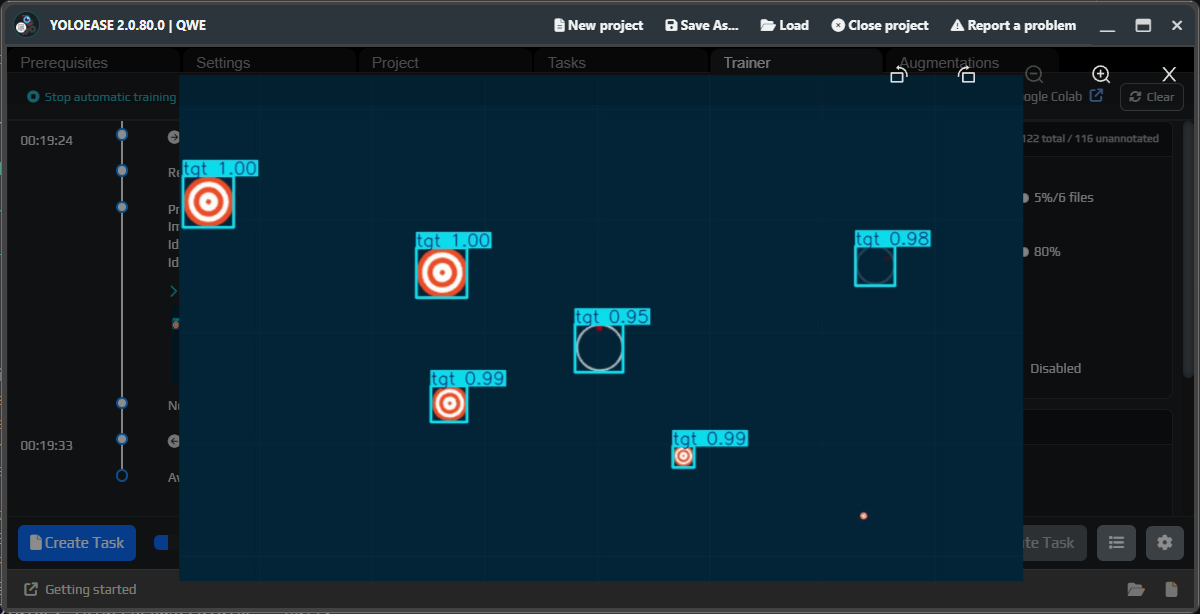
¶ Auto-label thresholds
After prediction, Trainer shows the detected labels and their confidence. You can use one shared Global threshold or separate Per Label thresholds.
If you get many false positives, raise the confidence threshold. If the model misses real objects, temporarily lower the threshold and review the suggestions manually. These thresholds affect selection and auto-labeling inside YoloEase; they do not replace runtime filters in EyeAuras.
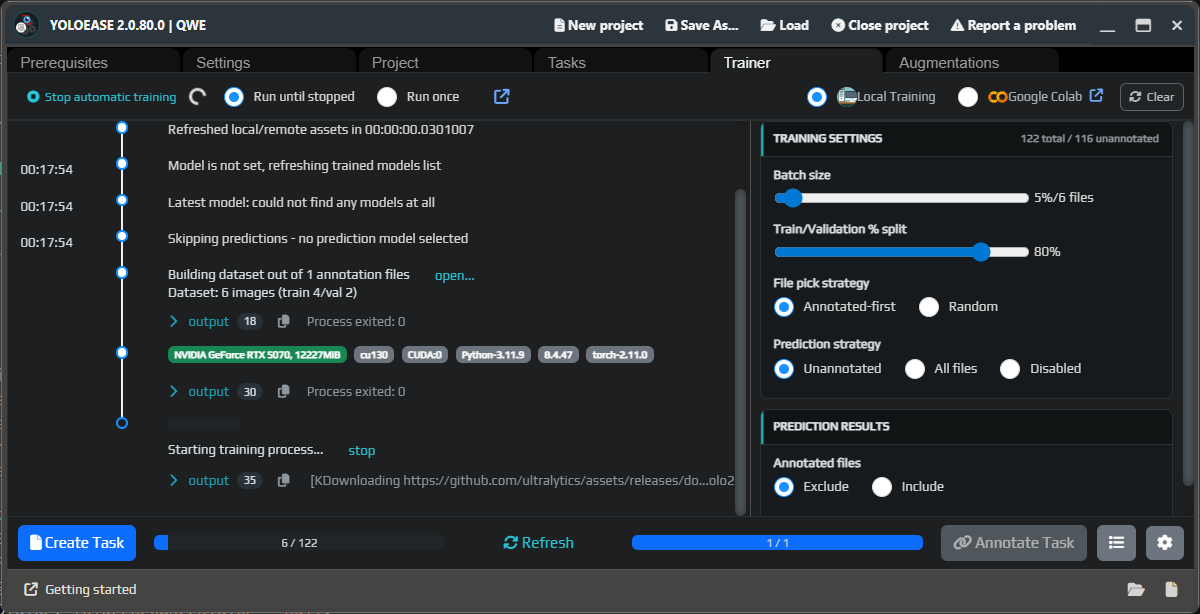
¶ Progress
The progress feed shows exactly what Trainer is doing:
- updating project files;
- skipping predictions if there is no model yet;
- applying augmentations, if enabled;
- building the dataset;
- running local training or preparing a cloud run;
- exporting to ONNX;
- running predictions with the new model.
¶ Metrics
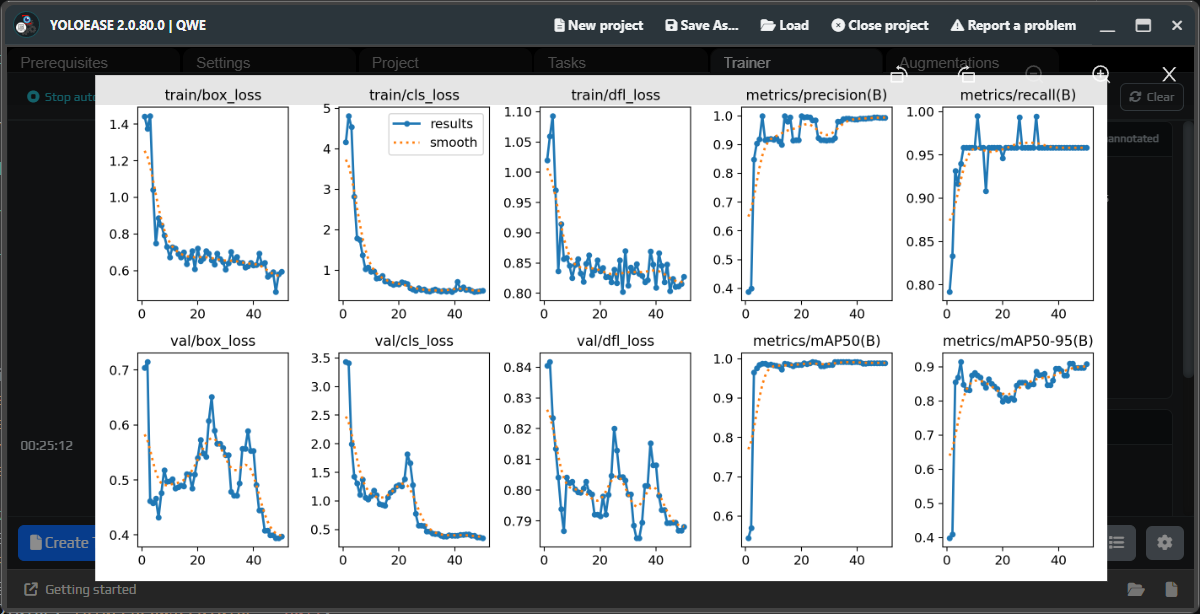
After training, look at the chart. The overall trend matters more than any single value: losses should go down, while precision, recall, and mAP should go up.
| Metric | How to read it |
|---|---|
precision |
How rarely the model produces extra false detections. |
recall |
How rarely the model misses real objects. |
mAP50 |
Overall quality at a more forgiving bounding-box match threshold. |
mAP50-95 |
A stricter measure of bounding-box quality. |
train/val loss |
Training and validation error; the trend matters more than one spike. |
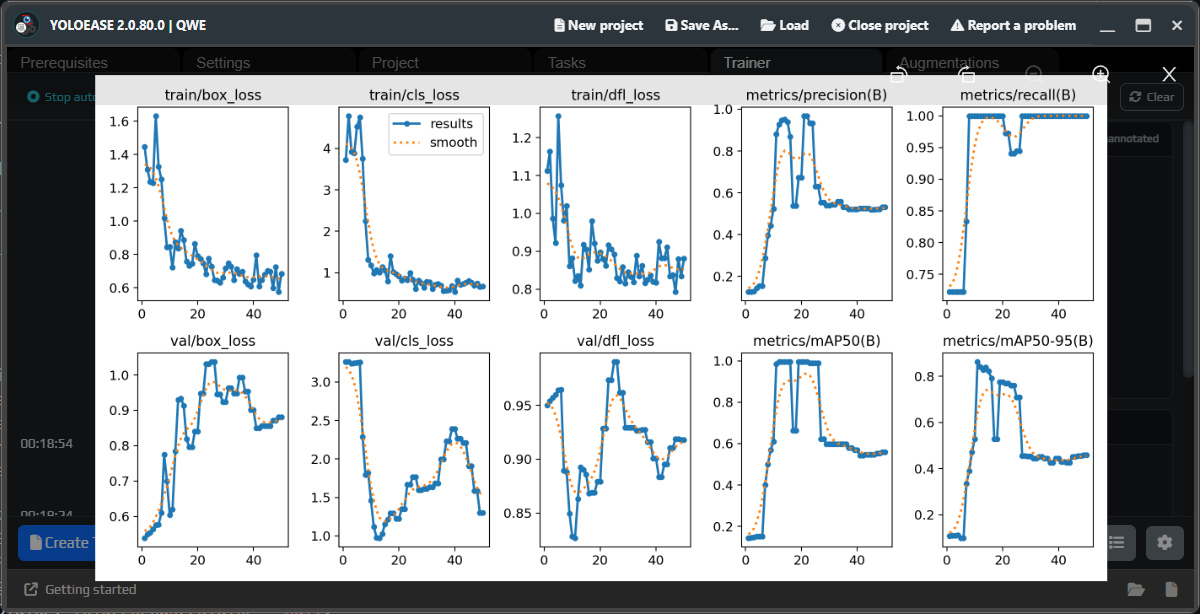
With only the first few dozen frames, the chart may look noisy or strange. After the second or third iteration, it usually becomes more stable because the dataset already contains more corrected examples.
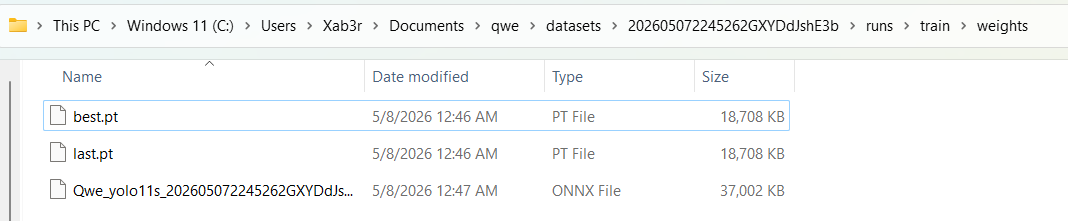
¶ Output files
After training starts, YoloEase converts the model to ONNX. You can use Open to open the output folder.
You will usually find:
best.pt— the best PyTorch weights;last.pt— the weights from the last epoch;.onnx— the model used by EyeAuras and for predictions.
Typical output structure:
datasets/<run-id>/
  data.yaml
  cvataat.json
  train/images, train/labels
  valid/images, valid/labels
  runs/train/weights/best.pt
  runs/train/weights/last.pt
  runs/train/results.png
  runs/train/results.csv
  runs/train/weights/best.onnx
To continue training, you need the .pt file. For EyeAuras and most runtime scenarios, use .onnx.
¶ YOLO commands
Local training runs Ultralytics YOLO with arguments roughly like these:
task=detect mode=train plots=true model=<base-model> data=<data.yaml> imgsz=<Model Size> epochs=<Epochs>
If CUDA is available and you did not set device manually, YoloEase adds device=0. If workers is not specified, YoloEase adds workers=0 to avoid memory growth from multiprocessing on Windows. In Additional arguments, you can add values such as batch=8, patience=20, device=cpu, workers=2, cache=false, amp=false.
Do not add conflicting arguments unless you really need them: they may override the UI settings or break the run.
See also: YOLO ONNX and model weights, EyeAuras integration, diagnostics.